被问到了,就补一下。
简述代理模式
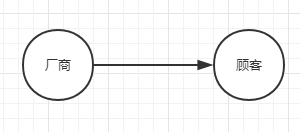
代理是英文(Proxy)翻译过来的,在我们的实际生活中,最常见的代理模式应该是朋友圈中的微商了。在起初的时候,厂商直接对标顾客,没有微商在中间赚差价,结构就是如图。

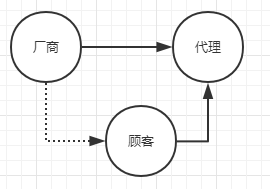
之后慢慢的微商汇总了优质资源,顾客没必要自己去挑厂商货比三家,只需要从微商那里买就行了。所有就有了如下的结构:
而程序设计都是从生活中的实例出现的,所以Java中也产生了代理模式。
本文将一一介绍
静态代理
当我们看到了微商不厌其烦刷朋友圈的广告,耐不住优惠从微商那里买了一双,微商可能还会向我们推一些别的优惠活动之类的,那么这个过程我们用代码模拟一下。
首先我们需要有一个鞋子的接口,通用的接口是代理模式实现的基础。定义一个sell接口,代表鞋子可以被卖出去的能力。
package com.proxy.weishang;

// 定义鞋子接口
public interface Shoes {
    void sell();
}
然后再来一个真正的鞋子类,需要实现Shoes的接口
package com.proxy.weishang;

// 真正的鞋子类
public class RealShoes implements Shoes {
    @Override
    public void sell() {
        System.out.println("卖出了一双鞋子哦,美汁汁~");
    }
}
和一个代理类(微商类)
package com.proxy.weishang;

// 微商 代理
public class MicroSell implements Shoes {
    RealShoes realShoes;

    public MicroSell(RealShoes realShoes) {
        this.realShoes = realShoes;
    }

    public void setRealShoes(RealShoes realShoes) {
        this.realShoes = realShoes;
    }


    @Override
    public void sell() {
        beforeSell();
        realShoes.sell();
        afterSell();
    }

    public void beforeSell() {
        System.out.println("买之前宣传:帅哥,买双鞋子吗?高仿阿迪199两双");
    }

    public void afterSell() {
        System.out.println("买之后推销:帅哥,再来双高仿耐克?");
    }
}
接下来我们测试下
package com.proxy;

import com.proxy.weishang.MicroSell;
import com.proxy.weishang.RealShoes;

public class Main {

    public static void main(String[] args) {
        MicroSell microSell = new MicroSell(new RealShoes());
        microSell.sell();
    }
}
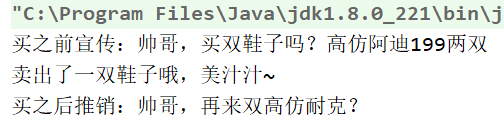
在微商卖出鞋子的前后,执行了
beforeSell和afterSell疯狂推销,那么使用代理模式的好处就在于这,从之前最基本的厂商对顾客,鞋子只有单一的sell能力,而使用代理模式之后,我们并没有改变鞋子的sell能力就可以对其进行功能的拓展和附加。
总结一下静态代理的优点:
1. 无需修改被代理的对象
2. 无损拓展功能
3. 解耦合
缺点当然也存在:
1. 要为每一个接口实现代理类,一旦接口增加方法,目标对象与代理对象都要维护。
动态代理
动态代理也是代理,他和静态代理的功能和目的是没有区别的,唯一的区别就在于动态代理是动态生成的,省去为接口实现代理类的操作。
何为动态生成
其实就是Java在内存中创建了一个实现接口的代理,而不需要我们自己定义。多说无益,看代码
我们仍然使用微商的例子来进行讲解。当微商想卖你莆田耐克的时候:
package com.proxy.dynamicProxy;

// 定义鞋子接口
public interface Shoes {
    void sell();
}
package com.proxy.dynamicProxy;

// Nike鞋
public class NikeShoes implements Shoes {
    @Override
    public void sell() {
        System.out.println("卖出去一双莆田耐克,美滋滋~");
    }
}
package com.proxy.dynamicProxy;

import java.lang.reflect.InvocationHandler;
import java.lang.reflect.Method;

public class dynamicMicroSell implements InvocationHandler {
    Object shoes;

    public dynamicMicroSell(Object shoes) {
        this.shoes = shoes;
    }

    public void setShoes(Object shoes) {
        this.shoes = shoes;
    }

    @Override
    public Object invoke(Object proxy, Method method, Object[] args) throws Throwable {
        System.out.println("推销前:美女莆田阿迪来一双?");
        method.invoke(shoes, args);
        System.out.println("推销后:耐克要吗?");
        return null;
    }
}
测试下
package com.proxy;

import com.proxy.dynamicProxy.AdidasShoes;
import com.proxy.dynamicProxy.NikeShoes;
import com.proxy.dynamicProxy.Shoes;
import com.proxy.dynamicProxy.dynamicMicroSell;

import java.lang.reflect.Proxy;

public class Main {

    public static void main(String[] args) {
        NikeShoes nikeShoes = new NikeShoes();
        dynamicMicroSell nikeSeller = new dynamicMicroSell(nikeShoes);
        Shoes nikeProxy = (Shoes) Proxy.newProxyInstance(NikeShoes.class.getClassLoader(), NikeShoes.class.getInterfaces(), nikeSeller);
        nikeProxy.sell();
    }
}
可以看到我并没有像静态代理那样重新实现一个代理类,而是实现了
InvocationHandler 接口的invoke方法实现的代理。通过Proxy.newProxyInstance()创建了一个代理类来执行sell方法。
先不说InvocationHandler到底是什么东西,我们此时如果想要拓展一个阿迪鞋子的接口,应该怎么用动态代理实现?很简单,新建一个AdidasShoes还是实现Shoes接口
package com.proxy.dynamicProxy;

public class AdidasShoes implements Shoes {
    @Override
    public void sell() {
        System.out.println("卖出去一双莆田阿迪,美滋滋~");
    }
}
其他不需要变化,在main中通过dynamicMicroSell和Proxy.newProxyInstance()动态生成代理类就可以了
package com.proxy;

import com.proxy.dynamicProxy.AdidasShoes;
import com.proxy.dynamicProxy.NikeShoes;
import com.proxy.dynamicProxy.Shoes;
import com.proxy.dynamicProxy.dynamicMicroSell;

import java.lang.reflect.Proxy;

public class Main {

    public static void main(String[] args) {
        NikeShoes nikeShoes = new NikeShoes();
        dynamicMicroSell nikeSeller = new dynamicMicroSell(nikeShoes);
        Shoes nikeProxy = (Shoes) Proxy.newProxyInstance(NikeShoes.class.getClassLoader(), NikeShoes.class.getInterfaces(), nikeSeller);
        nikeProxy.sell();

        AdidasShoes adidasShoes = new AdidasShoes();
        dynamicMicroSell adidasSeller = new dynamicMicroSell(adidasShoes);
        Shoes adidasProxy = (Shoes) Proxy.newProxyInstance(AdidasShoes.class.getClassLoader(), NikeShoes.class.getInterfaces(), adidasSeller);
        adidasProxy.sell();

    }
}
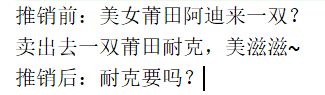
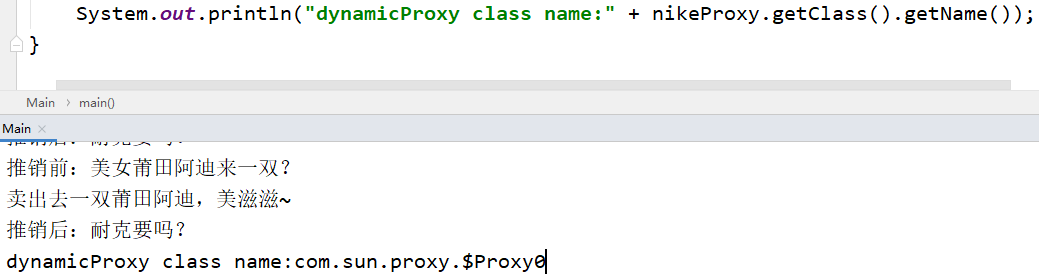
运行如图

动态代理的优点是很明显的,它不需要为每一个接口都创建代理类,大大减少重复工作。
动态代理的秘密
在我们使用静态代理的时候,是通过new MicroSell()创建代理实例,动态代理肯定也有创建实例的动作,要找到在哪里创建了代理实例,我们需要跟进到Proxy.newProxyInstance()一探究竟
public static Object newProxyInstance(ClassLoader loader,
                                      Class<?>[] interfaces,
                                      InvocationHandler h)
    throws IllegalArgumentException
{
    Objects.requireNonNull(h);

    final Class<?>[] intfs = interfaces.clone();
    final SecurityManager sm = System.getSecurityManager();
    if (sm != null) {
        checkProxyAccess(Reflection.getCallerClass(), loader, intfs);
    }

    /*
         * Look up or generate the designated proxy class.
         */
    Class<?> cl = getProxyClass0(loader, intfs);

    /*
         * Invoke its constructor with the designated invocation handler.
         */
    try {
        if (sm != null) {
            checkNewProxyPermission(Reflection.getCallerClass(), cl);
        }

        final Constructor<?> cons = cl.getConstructor(constructorParams);
        final InvocationHandler ih = h;
        if (!Modifier.isPublic(cl.getModifiers())) {
            AccessController.doPrivileged(new PrivilegedAction<Void>() {
                public Void run() {
                    cons.setAccessible(true);
                    return null;
                }
            });
        }
        return cons.newInstance(new Object[]{h});
    } catch (IllegalAccessException|InstantiationException e) {
        throw new InternalError(e.toString(), e);
    } catch (InvocationTargetException e) {
        Throwable t = e.getCause();
        if (t instanceof RuntimeException) {
            throw (RuntimeException) t;
        } else {
            throw new InternalError(t.toString(), t);
        }
    } catch (NoSuchMethodException e) {
        throw new InternalError(e.toString(), e);
    }
}
可以看到通过cl这个class反射调用其构造函数返回了一个实例
private static Class<?> getProxyClass0(ClassLoader loader,
                                       Class<?>... interfaces) {
    if (interfaces.length > 65535) {
        throw new IllegalArgumentException("interface limit exceeded");
    }

    // If the proxy class defined by the given loader implementing
    // the given interfaces exists, this will simply return the cached copy;
    // otherwise, it will create the proxy class via the ProxyClassFactory
    return proxyClassCache.get(loader, interfaces);
}
直接通过缓存获取,如果获取不到,注释说会通过 ProxyClassFactory 生成。
private static final class ProxyClassFactory
    implements BiFunction<ClassLoader, Class<?>[], Class<?>>
{
    // prefix for all proxy class names
    private static final String proxyClassNamePrefix = "$Proxy";

    // next number to use for generation of unique proxy class names
    private static final AtomicLong nextUniqueNumber = new AtomicLong();

    @Override
    public Class<?> apply(ClassLoader loader, Class<?>[] interfaces) {

        Map<Class<?>, Boolean> interfaceSet = new IdentityHashMap<>(interfaces.length);
        for (Class<?> intf : interfaces) {
            /*
                 * Verify that the class loader resolves the name of this
                 * interface to the same Class object.
                 */
            Class<?> interfaceClass = null;
            try {
                interfaceClass = Class.forName(intf.getName(), false, loader);
            } catch (ClassNotFoundException e) {
            }
            if (interfaceClass != intf) {
                throw new IllegalArgumentException(
                    intf + " is not visible from class loader");
            }
            /*
                 * Verify that the Class object actually represents an
                 * interface.
                 */
            if (!interfaceClass.isInterface()) {
                throw new IllegalArgumentException(
                    interfaceClass.getName() + " is not an interface");
            }
            /*
                 * Verify that this interface is not a duplicate.
                 */
            if (interfaceSet.put(interfaceClass, Boolean.TRUE) != null) {
                throw new IllegalArgumentException(
                    "repeated interface: " + interfaceClass.getName());
            }
        }

        String proxyPkg = null;     // package to define proxy class in
        int accessFlags = Modifier.PUBLIC | Modifier.FINAL;

        /*
             * Record the package of a non-public proxy interface so that the
             * proxy class will be defined in the same package.  Verify that
             * all non-public proxy interfaces are in the same package.
             */
        for (Class<?> intf : interfaces) {
            int flags = intf.getModifiers();
            if (!Modifier.isPublic(flags)) {
                accessFlags = Modifier.FINAL;
                String name = intf.getName();
                int n = name.lastIndexOf('.');
                String pkg = ((n == -1) ? "" : name.substring(0, n + 1));
                if (proxyPkg == null) {
                    proxyPkg = pkg;
                } else if (!pkg.equals(proxyPkg)) {
                    throw new IllegalArgumentException(
                        "non-public interfaces from different packages");
                }
            }
        }

        if (proxyPkg == null) {
            // if no non-public proxy interfaces, use com.sun.proxy package
            proxyPkg = ReflectUtil.PROXY_PACKAGE + ".";
        }

        /*
             * Choose a name for the proxy class to generate.
             */
        long num = nextUniqueNumber.getAndIncrement();
        String proxyName = proxyPkg + proxyClassNamePrefix + num;

        /*
             * Generate the specified proxy class.
             */
        byte[] proxyClassFile = ProxyGenerator.generateProxyClass(
            proxyName, interfaces, accessFlags);
        try {
            return defineClass0(loader, proxyName,
                                proxyClassFile, 0, proxyClassFile.length);
        } catch (ClassFormatError e) {
            /*
                 * A ClassFormatError here means that (barring bugs in the
                 * proxy class generation code) there was some other
                 * invalid aspect of the arguments supplied to the proxy
                 * class creation (such as virtual machine limitations
                 * exceeded).
                 */
            throw new IllegalArgumentException(e.toString());
        }
    }
}
可知代理类名为String proxyName = proxyPkg + proxyClassNamePrefix + num,即包名+$Proxy+id序号
生成代理类的核心代码
byte[] proxyClassFile = ProxyGenerator.generateProxyClass(proxyName, interfaces, accessFlags);
return defineClass0(loader, proxyName,proxyClassFile, 0, proxyClassFile.length);

通过修改Java字节码的形式定义class,这就是动态代理自动生成的秘密。来看下动态代理的类名
总结
代理模式被运用于spring框架的aop面向切面编程中,个人业务需求可以应用在日志记录、性能统计等场景中。
最后几句话总结下:
1. 代理模式的好处在于不修改现有代码的基础上进行拓展功能
2. 不管是动态还是静态代理都要实现接口,本质是面向接口编程
3. 静态代理需要自己实现Proxy类,动态由Proxy.newInstance()反射动态生成
4. 两者区别在于是否需要自己手动实现Proxy类
文笔垃圾,措辞轻浮,内容浅显,操作生疏。不足之处欢迎大师傅们指点和纠正,感激不尽。
原创文章,作者:Y4er,未经授权禁止转载!如若转载,请联系作者:Y4er
 微信扫一扫
微信扫一扫  支付宝扫一扫